12/21/07

Christmas Card To You


Merry Christmas Everyone! From my family to you!

As you can imagine, it's BUSY at our house, but I love this time of year! I hope you are all enjoying it as much as I am!

12/17/07

Cooking 101 - Peppermint Crunch Cookies

IS IT TOO GOOD TO BE TRUE?! After I wiped the tears from my eyes in the baking aisle of the store, blinked back the blurriness, and came to my senses, it really was true that the candy-lovin' geniuses out there FINALLY made peppermint chips for the holidays! I quickly snagged a couple of bags (gonna go back and get more) with NO idea what to do with them...but it didn't matter!

The recipe is on the back of the bag, but here it is:

(NOTE: These are kind of thin and soft - I like mine to be less thin so if you're a "thicker" cookie gal then scale back a little on the butter. )

2 sticks butter, softened
1 c. brown sugar, packed
1/3 c. granulated sugar
1 large egg
2 tsp. vanilla
1/2 tsp. baking soda
1/2 tsp. salt
1 3/4 c. flour
1 c. old fashioned oats
1 c. sweetened, shredded coconut
1 1/4 c. coarsly chopped pecans (or whatever nut you like)
1 1/2 c. Andes Peppermint Crunch Baking Chips

Preheat oven to 300 degrees (I used 325). Using an electric mixer, cream butter and sugars until fluffy (about 3 minutes). Beat in egg and vanilla. On low speed, add baking soda, salt and then flour. Mix completely. Stir in oats, coconut, pecans, and peppermint chips.

These cookies spread WAY out, so drop small spoonfuls of dough onto cookie sheet (about 1 Tbsp). Bake for 12-15 minutes or until edges are slightly browned and middle is still gooey. Remove from cookie sheet and let cool.

AND THEN EAT ABOUT A HUNDRED OF THEM with some PEPPERMINT COCOA!


12/13/07

New Stuff

Just an F.Y.I. - I've tweaked the links on this site and I've added a new "Aprons" category. I'm so disappointed in myself that I haven't made more aprons to put on this site since I'm obsessed with them, but alas - I'm lazy.

This photo is my cute friend, Raquel, who makes aprons and I love her stuff! You'll have to check out Sew What, her aprons-for-sale blog.

I think a cute, spunky apron would be such a great gift for that good friend of yours!

Cooking 101 - Maple Spice Cake


I love when something LOOKS complicated, but it's really something simple all jazzed up! This cake was SO good and moist, you'd never know how easy it was.

(Really, if you haven't caught on by now, I'm LAZY and I don't like complicated procedures...)

I had to bring a dessert to an event and after AGONIZING over something easy enough, this one came to me by way of a box of Betty Crocker Spice Cake - thank you, Betty. You're my girl.

MAPLE SPICE CAKE:

1 Box Spice Cake Mix
1/3 c. canola oil
1 1/4 c. applesauce
1 c. chopped nuts
3 eggs

(I'm pretty sure these instructions & ingredients are listed on the box)
Mix everything together well, bake at 350 degrees for about 35 minutes. I used two different sizes of round cake pans. Use whatever you have and whatever is easiest. Allow the cake to cool completely before you attempt to frost it.

FROSTING:

1 stick butter, room temperature
4 oz. cream cheese, room temperature
1 c. powdered sugar
1/2 c. maple syrup
3/4 c. chopped nuts

Mix everything together except nuts. When frosting is creamy, fold in the nuts.

12/12/07

Paper Trees

Here's a seriously quick and easy little something you can give away or make a bunch for your house. Make a trio with large, medium, and small trees! Use crazy colors, earth tones, or whatever matches your decor.

The more I get involved in projects, the more I dislike paint, glue, and mess. These trees are about as and mess-free as it gets - just paper and pins!

For this size of tree, here's what you'll need:

Styrofoam Cone: 3 7/8 x 8 7/8 (medium size)
Paper: 3 1/2" x 1" strips, approximately 15 for the base, 14 for the next row, and so on.
Push pins
Bow

NOTE: If you're doing a trio, the large tree strips need to be 4" x 1", the medium tree 3 1/2" x 1" and the small tree 3" x 1" (go up or down 1/2 inch)

Start your base row up high enough for the paper to sit on the table without getting bent.


I arranged my loops over/under like this. Do it how you like, but this makes the tree look symetrical and fluffy.


Here's the bottom row finished


Start the next row just far enough above to where you don't see any of the bottom row pins.
Do this all the way around!


When you get to the top, it's good to pin everything down like this or you'll have corners poking out.


And to finish it all off, pin a bow right on top.


No glue, no mess! Just cute!


If you want to see a gallery of these, as well as other varieties, go here to Splitcoast Stampers.


Music Junky

(Chanda, this is in honor of you!!!)

I'm ALWAYS on the lookout for some good tunes and I realize that not everybody likes the same music, but here are some of my FAVORITES that keep me going through my Holiday projects...

(you can only listen to SO much Christmas music.)

Blake Lewis - Audio Daydream
I'm not embarrased to say that I watched Blake through his American Idol stint and I've always liked his style. I like just about everything on this new album.


OneRepublic is fast becoming one of my favorites. If you like the Fray, you'll like these guys. Dude plays his own piano, too! "Stop and Stare" is on my repeat button.


Dashboard Confessional -"Stolen" - go get it.


Does anyone out there have some good suggestions? I'm always up for some new stuff.

Cooking 101 - Aunt Jen's Peanut Clusters


My husband's aunt Jen is one of my most favorite people on earth. She once showed me how she made her signature peanut clusters and my jaw hit the floor as I'm watching her microwave chocolate chips, throw in the peanuts, and plop them down on waxed paper. She was done and my mouth was still wide open with awe. (probably with drool puddling everywhere.)
It's seriously that easy - I had no idea. I've been making them every Christmas since!

Here's what you'll need:
3 pkgs. Ghiradelli chocolate chips - I used 1 pkg semi-sweet and 2 pkgs milk
1 16-oz. jar Dry Roasted peanuts
2 large cookie sheets lined with waxed paper

Melt chocolate either in a double broiler or carefully in the microwave. The microwave will burn the chocolate if you don't stir and rotate it often. (I KNOW this...) Like I said before, my fancy, high-tech double broiler is a huge glass mixing bowl atop my stockpot with softly boiling water. Too much steam will ruin the chocolate, so make sure the burner is turned down fairly low. (I KNOW this, too...I've ruined lots of chocolate, honey!)

When your chocolate is melty and creamy, add your peanuts a little at a time. If you have too much chocolate, add more peanuts. You know the mixture is perfect when all of the peanuts are coated with chocolate and there's not much excess chocolate.

Then drop spoonfuls of the mixture onto your waxed paper cookie sheets and let them cool. I usually put mine out in my 20-degree garage for a little bit and they're perfect, but for those of you NOT living in the Arctic regions, your fridge will work. Or just let them sit on your counter.

Store the clusters in an air-tight container and if you need them to last a while, keep them in the fridge until you have to use them. After a few days, the chocolate gets grainy.

ENJOY!!!! I love ya, Aunt Jen!

12/8/07

Great Balls of Fire

This is my creation from last year that I have to share with you. I have the cutest little tree out front and I wanted little "fruits" to go in my little tree SO bad! I was NOT going to spend $10 per ball at the store, so I made my own. I grew up with the idea that you can do anything with duct tape and some imagination - SO TRUE!


My little great balls of fire were created by wadding up dozens of plastic grocery bags together (save the earth) in a spherical-form and wrapping them with masking tape. Then I wrapped a string of red lights around each ball and secured it by wrapping a little wire around it. It took some thinking to get them all strung together, but it worked!


So this is the second year I've been able to use my beautiful little fruits and I LOVE it! Living here in the Arctic plays with your head a bit because every living thing outdoors is DEAD, gray, and covered with snow. At least I can feel like I have a fruit tree at night.

How Could I Forget?!

First of all, thanks so much for providing me with a weekend of entertainment!!! Our Top 5 List was so much fun to read - and thanks for all of the nice compliments - you're WAY too nice!

AND!!! How could I forget?! Diet Pepsi - Hello?! (I actually love Diet Pepsi Max) I could not live without that, nor could I survive without my hair drier. Thanks for helping me remember what's REALLY important.

You're SO STINKING AWESOME!

12/5/07

5 Things You Can't Live Without...

(don't you LOVE this painting?! It's always been one of my favorites! --artist is Michael Sowa) Someday I will own one of these...

Life in my world has been SO busy and hectic. Today was one of the busiest days I've had in a LONG time. I had to get up early & make bake sale treats for my son, make breakfast and put together lunches for everyone, get the kids to school, have a 30 second shower and 10 second blow-dry, fill out new paperwork for doctor office visits for myself and all three kids (got a new doctor), drive to the doctor's office in the snow...15 minutes late..., get the kids back in time for lunch and home in time to meet friend to help her with a dollhouse from "Santa". WHEW! I'm sweating just thinking about it. I was honestly so stressed that I was gonna PUKE.


Now that it's 11:00 p.m., I want nothing more than to take off my bra, climb into bed, and doze for a week. And that got me thinking... GO WITH ME ON THIS...One of the GREATEST joys I could have right now is a response from everyone who reads this blog! What are the 5 (or 6) THINGS you can't live without right now in your life?...not counting kids, family, mushy stuff like that. THINGS. PRODUCTS. You know...necessities.
I can already feel my stress melting away!

Here's mine (I think):
6.) Dishwasher
5.) Waterproof mascara
4.) Great haircut
3.) Vicky Secrets Bras - my girls never looked so good
2.) iPod
1.) Cell Phone
1+.) Computer/Internet
1 ++.) Chocolate anything

12/3/07

Cooking 101 - Chocolate Turtles

Don't you want to sink your teeth into one of these yummy morsels?! Same here - and I did sink my teeth into a morsel...or two...or maybe three but I'm stopping counting at three.


You'll need:
2 or 3 14-oz. bags of caramels
evaporated milk
1 16-oz. bag of whole pecans
2 bags chocolate chips - I use half milk, half semi sweet
Foil
Waxed paper

1.) Unwrap and melt caramels. Throw them all in a big pot with some evaporated milk and stir them until it's all smooth and creamy. I don't think you need much of the milk, just enough to thin down the caramels and allow them to melt without burning. Maybe 1/4 c. of evaporated milk - maybe a little more.

2.) Once the caramel is all melted and gooey, add your pecans. You want every pecan to be evenly coated and then some. You don't want to add too many pecans and then end up with not enough melted caramel.

3.) Lay sheets of foil (you can spray them with Pam spray if you want) on your countertop and scoop out little spoonfulls of the caramel pecan mixture. Allow them to cool enough for you to handle them.

DO NOT USE WAXED PAPER FOR THIS STEP. Your caramels will stick to the paper and NEVER come off and you'll ruin the turtles forever! (All will be lost and you will cry big tears...) I know this.

4.) While your little turtle babies are cooling, melt your chocolate either in the microwave (carefully) or with the double-broiler method. I fill my stockpot less than half-way with water, put it on the stove to heat and then I put a huge, glass bowl on top of the pot. As long as NO moisture gets into the chocolate, including steam, this way is pretty easy. If your bowl is too small on top of the pot, you'll get moisture and ruin the chocolate.

5.) Peel off the turtles from the foil, discard the foil, and roll out sheets of waxed paper. Then, using toothpicks, dip each turtle into the melted chocolate, shake off the excess, and allow to cool on the waxed paper.

6.) After the turtles have cooled off, eat as many as you can before you pass out! This is always better to do with a good friend. Good Holiday fun....


Then package them in some cute bags like this from Papertrey Ink and you've got something that was actually pretty easy that people will LOVE.

My Peppermint Tree

Blogger has been having problems lately and I've avoided posting all weekend in hopes that they would have their photo-issues resolved but they don't.

So I've given up waiting and I'm now unveiling my new 9-foot creation! I'm done with my Peppermint Tree! I really do need one more bag of mints to finish the bottom, but I'm sick of it and I'm done. After sustaining 3rd-degree burns over 90% of my fingertips, my children were pointing candy canes at me and shouting, "Put down the glue gun and walk away from the candies!"

Now it's not exactly the Hollywood version I had envisioned in my mind, but I had to keep telling myself that I don't have a $10K budget - I have a $10 budget. (how embarrasing talking to myself like that at Wal Mart...people were staring...) So with a bunch of bows, peppermints and hot glue, this is what I got and I love it!


11/28/07

More Fun For Kids


She's at it again! Jenny over at Allsorts has created this ADORABLE (and addictive) gingerbread house activity for kids of all ages (this includes moms).
These little activities are SO great to help the little, little ones learn how to use the mouse, too. And, as a mom, can I add that sometimes when you just need a minute or two like, say, shower, use the bathroom, have an important phone conversation, these activities ROCK.

Tree Bows

Your old Christmas tree is tired. I KNOW these things. She's been there year after year, patiently standing still as you dress her up in her Christmas best. Inside, though, she's secretly wishing to be FABULOUS - so give her what she wants this year.

Below are some simple instructions for pretty bows that will give that tree a big splash of color. Now remember that these bows are going on a pretty, gilittery tree that's already busy enough - these don't have to be perfect. Nobody will notice anything other than how great your tree looks!

Plan on making about 15-20 bows, depending on how big your tree is. You don't want to do so many that it's overpowering and you don't want to do so few that it looks silly.

One spool of thick ribbon should do the whole tree if you use it carefully.


You'll need: wired ribbon, needle nose wire cutters, wire, scissors

It's SO handy if you pre-cut your wires. Make them long enough so you can twist them around your bow and then later your tree branch.


I'm right-handed so I usually start my bow like this with the tail facing my left.
(nevermind the unsightly scab on my left thumb - that's what I get for doing house work.)


Because this ribbon is one-sided (pattern is only on one side), we're going to have to twist it, making sure that the pattern is always exposed.


Give yourself enough ribbon leave a tail, and then twist so the pattern is underneath.


Fold a loop over that twist, holding the twist firmly with your left hand.


Here's what that first twisty loop looks like from the back. You're going to WORK those beautiful fingers!


Then give the ribbon another twist, turning the pattern underneath.


Fold that over the top and you're almost done!


Now scrunch it together, making a bow.


Without letting go, slip your wire over the front and around to the back, twist together to hold the ribbon tight.
Here is where the needle nose pliers come in handy - sometimes you need that extra help in getting the wire to pull tight enough and make that first twist. BE CAREFUL, however, because if your wire isn't very sturdy, the force will break the wire. Just use the pliers to pull it tight and then gently make the first twist. Then you can do a couple more with your fingers.

And because you left enough wire in the back, you can easily put these on your branches.
These bows are quick and easy, not meant to look perfect and professional. They do the trick, they look good, and they're SO much nicer than those nasty pre-tied bows at Wal-Mart!


Now we're going to make another quick and easy bow - the same concept as the Super Simple Hair Bow that I posted earlier.
Start with your ribbon, leaving enough for a tail.


Since this ribbon is sort of double-sided, I don't have to twist it. Just loop it over, making the loop the size you want the bow to be.


Keep making loops on either side until you have it as full as you want it. I did two loops on either side, making the last two loops a little shorter than the first two so there's a little dimension in the bow.

Then scrunch it together like before, making a center point for your wire.


Now I used a white twist tie on this one because I've got about a million of them and I'm going to cover it up anyway.

Now you're going to make a center knot for your bow. Tie your ribbon like this, put one end of your ribbon through the center, and pull. You don't have to pull it tight, just enough to where you have a pretty knot.


Then place the knot on the center of the bow, and tie it around back.


Before your back knot is tied tight, put your tree branch wire on the bow and then pull the back knot tight to secure everything in place.


Fluff up your bow and you've got something pretty for your tired old tree!


11/27/07

Hustle and Bustle


Whew! We got Thanksgiving taken care of and all of us had such a great time being together! You can't see the two other tables set up in my living room, but we had 12 adults and 15 children - and everybody fit niceley and got PLENTY to eat!!!


This is the adult table I had all set up. I'm not a big pillar candle fan, but there's something cool about eating a nice dinner with the glow of firelight and this was all I had - so that's what we used. This table cloth was a piece of remnant upholstery fabric at JoAnn's that I hemmed quickly the night before (it barely fit!). I LOVED how it was velvety soft yet very thick and heavy-like. And because it's a rusty red color, which perfectly matches my home decor, I can use it for many other occasions like Valentine's Day, Christmas, or even a nice dinner with friends - so my $12 piece of fabric has turned into a seasonal LIFE-SAVER!

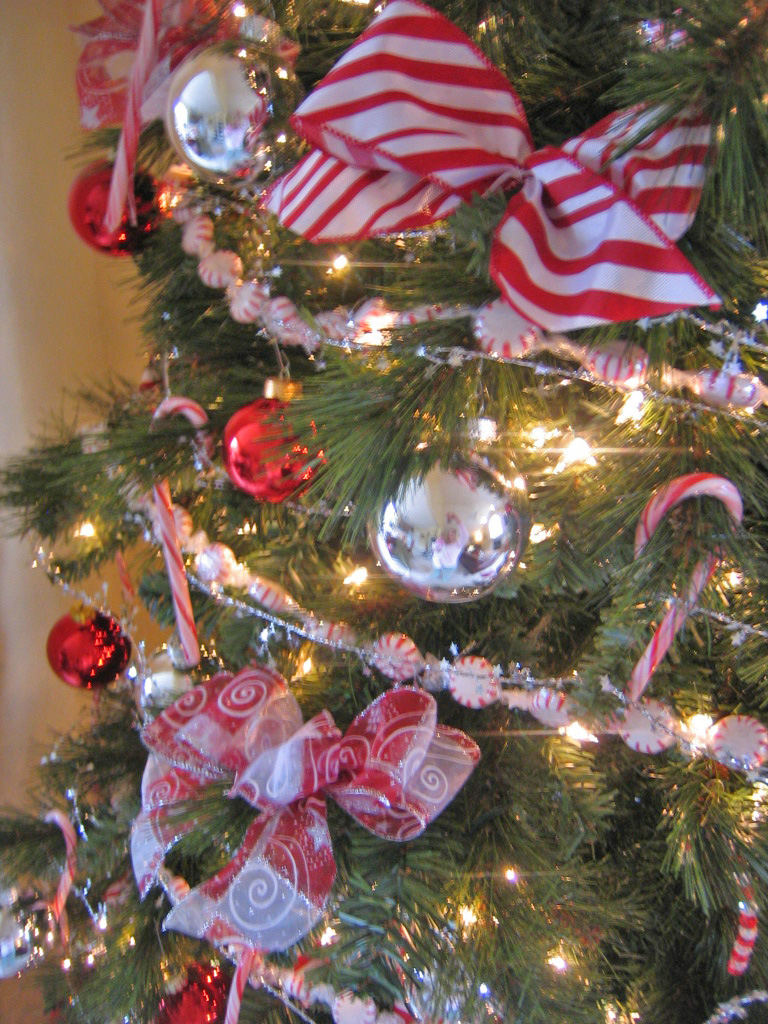
So now it's time to move forward with the Christmas decorating and projects I've got lined up for myself. I decided this year that I want a "Peppermint" tree, so I'm beginning to find all kinds of ways to incorporate all things red, white, silver, glittery, and minty.

This picture is just a sneak peek - I'm a LONG way off in getting the tree all done. I'm envisioning some red and white ribbon candies (made with actual ribbon) with the glitter spray in my craft box, and real peppermint disks in the wrappers glued to something somehow - not quite sure what I'll do but I'm thinking!

I'll keep you posted on my progress!

Just one more thing - you DON'T have to go out and spend a bunch of money on making your tree beautiful. Everything I'm doing has been very inexpensive - it doesn't get any cheaper than a 65-cent box of candy canes!

And don't understimate the power of great ribbon!!! You can make a room pop with a splashes of big, glittery bows on your tree, on your ornaments, on your garlands, on your picture frames, you name it!


Another bright idea I had was a simple Christmas countdown activity. I REALLY want to make one of those adorable hanging advent calendars with little pockets to hide candy and treasures, but I ran out of time and this was my next best idea. I found these packages of jewelry boxes at Wal-Mart and I got five 5-packs. I'm going to fill each one with a little scripture or a service project and a candy for each of my three kids. They get to open one box every night for 25 nights. GREAT, eh?! No sewing or glueing required! And they don't loose sight of why we celebrate Christmas.

Well HAPPY HOLIDAYS to all of you! Have fun with your festiveness - don't forget the mistletoe!

Stay tuned because I'm going to be posting my fleece winter hat and scarf soon!