

 EVERY baby needs something stylish to spit up on, don't you think?!


Every mom wishes she had dozens of these beautiful puke-wipers because they're SO handy, you use about a hundred a day, and moms just might actually
enjoy a 3:00 a.m. feeding with some of these! (okay, I'm stretching that one...)
A
friend of mine asked if I would sew up some burp cloths for her new baby girl coming soon and I agreed - as long as she brought over something yummy to munch on. She bought all of the fabric and cloth diapers, I just did the sewing.
Here's what she brought, too! YUM!
I see these burp cloths being sold EVERYWHERE and they're so easy to do. You could make a dozen of these in an hour.
First of all, a word about my
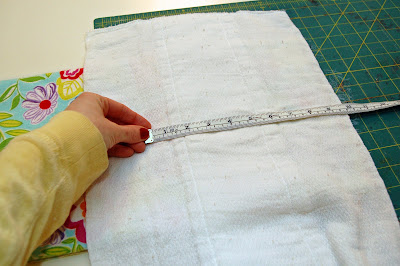
crazy-ugly (crugly) green mat. It is SUCH an eyesore but I want you to sear it into your corneas because you NEED to use a grid in order to get all of your cutting straight. Center the tops and sides of your fabrics at the same time. If your fabric doesn't fit, fold it in half.
Start by measuring the width of where the diaper is layered. These diapers were about 6 inches, so I figured 1/2 inch on both sides and 2 inches on the bottom of extra fabric would do the trick.
Cut a 7" x 20" strip of fabric. You could probably fold a yard in half and get two strips out of that one cut.
Iron about 1/4 inch on both sides.
(Check out the CRUGLY mat! It's been very well loved...)
Center the strip directly in the middle of the diaper, making sure your top edges are centered on both ends.

Press the top edges 1/4", fold over the top of the burp cloth, press and pin.


After making a couple of these ahead of time, I discovered that it's easier to stitch the top overlapping folds first before anything else.
Stitch close to the edge, about 1/8 of an inch.

After you've got the top two overlaps stitched, start at the top of one edge, stitch all the way down, close to the edge, and then do the other side.
AND THAT'S IT! You could do an entire pack of burp cloths in about 30 minutes!

These look so cute all folded up so nice. Come up with some creative packaging and you'll have the best baby shower gift ever!
VARIATION: Covering one side
Same concept, only we're going to cover the back of the cloth completely for a different look.

Measure 2 inches all the way around your burp cloth, cut to fit.
Make sure your lines are STRAIGHT!
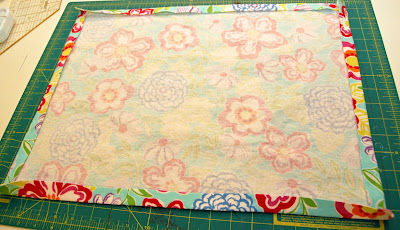
Press about 1 inch all the way around.

Take one of your diapers, make and sew a center strip WITHOUT the top overlapping. You can leave that raw because you're going to cover it.

Center the diaper on your backing, fold, press, and pin all the way around.

It really is so much easier to iron as you fold and pin.

Just tuck in the corners and overlap them - nothing fancy here. We're talking spit-up, ladies!

So this is how I did mine - you can do yours any way you want. I started at one corner at the very top, backstitched it in place, stitching close to the edge of the fold, all the way down to the bottom of the next corner, backstitch, and cut the thread.
Start again for each corner. Otherwise, you'll have openings where each corner overlapped and I'm not about to hand-stitch those shut since this is a BURP CLOTH.

Now I hope to see every mom with a few of these!

 For our Easter feasting, my mom (visiting me from Arizona) created this delectable dessert from an old cookbook in my collection. She thought it sounded good and we decided to try it out. WOW!!! This pie blows Marie Callender out of the WATER! You've got to try this! Nothing says SPRINGTIME like this cool, creamy pie!


